


Tutorial To Sell Travel Packages Online(Step-By-Step) For Easy Money-
Travelling is the most amazing thing anyone can do to improve their life. It opens everybody’s mind to new experiences, changes their perspective on life and gives everybody a chance to see the world.
And this is exactly what makes travel a highly profitable market from where you can make easy money if you know what to do.
You just need to learn the basics of it and use it to your advantage in this niche.
It isn’t that difficult once you understand the dynamics of how everything works together.
In this article, I will unlock a new dimension from where your travel packages will earn profits.
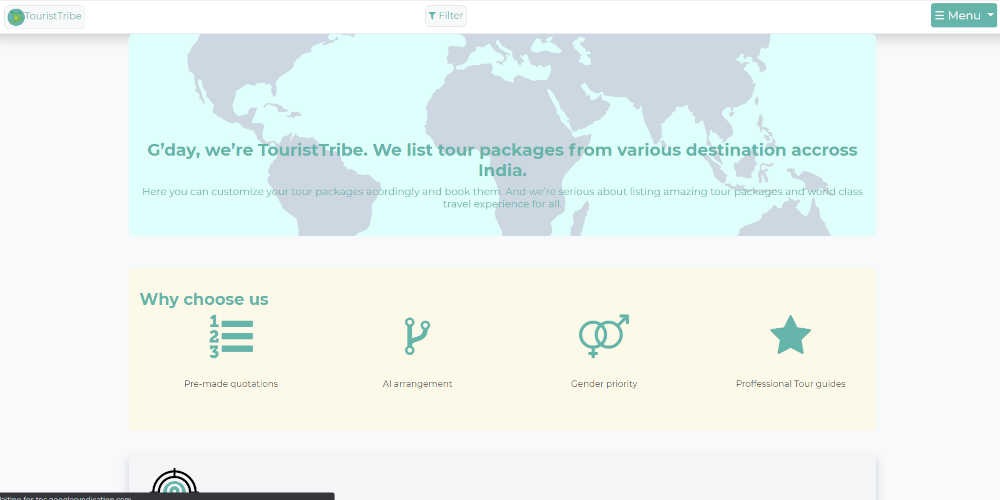
TouristTribe is a blooming travel aggregator company where tour operators like you can collaborate with them to display their tour packages and increase their sales.
Here’s a tutorial on how to begin your journey and start selling travel packages online.
Step By Step Guide on How To Create Your Portfolio in TouristTribe: Sell Travel Packages Online
1) Visit The TouristTribe Website

First of all, visit the home page of TouristTribe. Then scroll down and click the “Join US” link present beside “Do you operate tours?”.
2) Join As A New Tour Operator
Since you are new, click on the “click here” link, given below the submit button beside “Not registered yet?”.

3) Fill Up Form For Registration
The “click here” link will lead you to a form.
Fill up the given rows:
- Enter name – Give your name.
- Enter mobile number -Give your mobile number.
- Enter email id – Provide your email.
- Enter company name – Give your company’s name.
- Enter Aadhaar number – Give your Aadhaar number.
- Enter GST – Write your GST number.
- Enter password – Enter a unique password so that no one can access your account.
- Upload your logo.
4) Submit Your Form
After that, click on the “submit” button to submit your form.
Team TouristTribe will be verifying your form. Therefore, it may take a day or two to accept your request.
Hence, make no mistakes and supply accurate information. Even a small error will result in the cancellation of your request.
When the verification procedure is complete, TouristTribe will send you an email informing you of the outcome.
If your request is approved, you can log in through the “Join Us” link present in the HomePage of the TouristTribe.
5) Join Us
Click on the “Join Us” link and enter your email and password to open your account.
6) Redirect to Home Page
Click on the Submit button. And it will direct you towards your Home Page.
Home Page : How To Present Your Tour Packages
Your Home Page will display the following things:
- Start Upload a Tour Package
- Your Booking Details
- S.No.
- Group Id
- Customer Id
- Customer Details(name, email, mobile no.)
- Operator Details(name, email, company name, mobile no.
- Amount Paid By Customer
- Transfer Amount
- Package Details(Booking Date, No. Of Person, No. Of Room)
You must be thinking that you’ll have to fill it up right now. But, no, that is not what you need to do. Simply do what I instruct you to do.
7) Open Option
Take a look at the upper-left corner of your screen. You will see the “Open” option. Click on it.
You can see a complete menu in front of you.
7.1) My Profile
My profile will display all of the information you supplied while registering for your account.
For Example, NAME, EMAIL, COMPANY NAME, COMPANY WEBSITE, MOBILE NO, AADHAR NO and GST NO.

7.2) My TravelPreneur
My TravelPreneur will serve as your TouristTribe guide. They will help you handle your TouristTribe seller portal and do the job of filling in the details of every tour package.
You can see a list of TravelPreneur in your seller account. Just send them a request and wait for them to accept it.
Once one of them accepts it, you can negotiate your side with them.
Common Questions: How many requests can you send?
You can send a request to every TravelPreneur present in the list. There is no limit.
7.3) Location
Location is where you must enter all of the information about the locations of your tour packages.
Tour operators like you are likely to provide tour packages with various locations. Hence, you can enter as many locations as you like.
So, let’s look at the things you need to provide.
7.3.1) Upload Location

To Upload Details Click on “Upload Location” Present on the top of the screen.
- Enter location name – Enter the name of the place of your first tour package.
- Location served areas – Check the box that matches the location you’re entering. You can consider Kashmir, a prominent tourist destination, as an example of a hill station since it offers wonderful hill stations. So, check the box next to “Hill Station.” The following are the options that you can see.
- Forest
- Hill station
- Religious
- Beach
- Water activities
- Heritage
- Desert
- City tour
- Picnic spot
- Enter the maximum number of people to visit -Enter the maximum number of individuals your tour company can provide support at the same time.
- Enter min number of people for family booking – Enter the minimum number of members in a family for whom your tour company can provide support at the same time.
- Select File – Here, you will upload the pictures of your location.
After completing the above steps press, “Submit” to submit your first location.
After submitting the form for the first location, you can see the same page where you can enter your second location, and so on.
Once you submit it, it will direct you to the location page. The location page will display an overview of the pieces of information you have just entered.
If you want to enter another location, click on “Upload Meals” and apply the same steps to enter your second location.
Common Questions: Is there any limit for the number of locations that you can enter?
No, there is no limit.
7.4) Hotels
Hotels sections will consist of all the information about all the hotels present in your tour packages.
This page works exactly like the above location.
7.4.1) Upload Hotels


To Upload Details Click on “Upload Hotels” present on the top of the screen.
Here, you need to enter the,
- Hotel Name – Name of one of the hotels present in your tour packages.
- Location Name – Location of the hotel.
- Hotel Rating – Hotel Rating, i.e., whether it is 5 star, 4 star, 3 star, 2 stars or 1-star hotel.
- Room Type – Single Bed, Double Bed, Triple Bed.
Suppose if you check the box next to “Single Bed” then, a field for “Cost Of Single Bed” will appear. And the same goes for others as well.
That is, “Double Bed” will ask for “Cost Of Double Bed” and “Triple Bed” will ask for ”Cost Of Triple Bed”. All you need to do is enter the cost of bed per person per night.
- Hotel Type – Is your hostel AC or Non AC type. Check the box which matches your hotel type.
- Upload Hotel Photos – Upload photos of that hotel so that the customers can see it.
After completing the above steps press, “Submit” to submit your first hotel.
Once you submit the form for the first hotel, it will direct you to the hotel’s page. The location page will display an overview of the pieces of information you have just entered.
If you want to enter another hotel, click on “Upload Hotel” and apply the same steps to enter your second hotel.
Common Questions: Is there any limit to the number of hotels that you can enter?
No, there is no limit.
7.5) Meal Plan
The meals section will consist of the meals that your tour packages will provide.
7.5.1) Upload Meal Plan


To Upload Details Click on “Upload Meal Plan” present on the top of the screen.
Here, you need to enter the,
- Check the boxes next to these. Breakfast, Lunch, Evening tea, Dinner.
First, click on the meal plans. After that a few other fields will appear where you need to give the information respectively.
Suppose if you check the box next to “Breakfast” then, a field for Breakfast details will appear. And the same goes for others as well.
That is “Lunch” will ask for Lunch details or “Evening tea” will ask for, Evening details or “Dinner” will ask for Dinner details.
Enter what your tour packages will offer for breakfast, lunch, evening tea and dinner.
- Location Name – Enter the name of the cafe and restaurant that will provide the meal.
- Enter price per head -Enter the price of the meal for each person.
After completing the above steps press, “Submit” to submit your meal plan.
Once you submit it, it will direct you to the meals page. The meals page will display an overview of the pieces of information you have just entered.
If you want to enter another type of meal, click on “Upload Meals” and apply the same steps to enter your meal plan.
Common Questions: Is there any limit for the number of meals that you can enter?
No, there is no limit.
7.6) Licensing Fees
As part of giving a license, several places charge a significant amount for each passenger.
Licensing Fees allows you to enter such licencing data for any location you have already uploaded on the Location page.
7.6.1) Upload License Fees

To Upload Details Click on “Upload License Fees” present on the top of the screen.
Here, you need to enter the,
- Location Name – The location name is a drop-down menu that contains all of the places you entered in the Location Section. Select a location from there, where licensing fees are required.
- Enter License/ permission Fee – Enter the fees required per person.
- Enter License Fees Details – Enter details about the license fee, such as imposed government charges etc.
After completing the above steps press, “Submit”.
Once you submit it, it will direct you to the license page. The license page will display an overview of the pieces of information you have just entered.
If you want to enter a license fee for another location, click on “Upload License Fees” and apply the same steps to enter your license fee.
7.7) MidTrips
MidTrips may appear to be confusing at first, but it is not.
Let me explain this with an example. Suppose Sundarban is your location. Therefore, Midtrips are the areas in Sundarban where travellers can pay a visit. For Example, Sonakhali, Gosaba, Hamilton Saheb’s bungalow, Rabindronath’s Bungalow, Pakhir Jangle, Dobanki etc.
7.7.1) Upload MidTrip

To Upload Details Click on “Upload MidTrip” present on the top of the screen.
Here, you need to enter the,
- Select Location – The select location is a drop-down menu that contains all of the places you entered in the Location Section. Select a location to upload the MidTrips.
- Enter midtrip name – Enter the name of the area. For example, Sonakhali falls under Sunderban, so enter Sonakhali.
- Enter midtrip description – Describe the destination.
- Upload pictures – Upload as many pictures you can provide of the destination.
- Add Mitrip button – After entering all the details, click on “Add MidTrip”. Do this only if there is more than one area you want to add as a Midtrip.
When you click Add Midtrip, it will redirect you to the same form page where you can add as many Midtrips as you like.
After completing the preceding steps, click “Submit.”
Once you submit it, it will direct you to the MidTrip page. The MidTrip page will display an overview of the pieces of information you have just entered.
If you want to enter MidTrip for another location, click on “Upload MidTrip” and apply the same steps to enter the MidTrips for your second location.
7.8) Transport
The Transport Section will help you to enter all types of transport your tour company provides. For example, an mv boat, sedan(car), anything.
7.8.1) Upload Transport
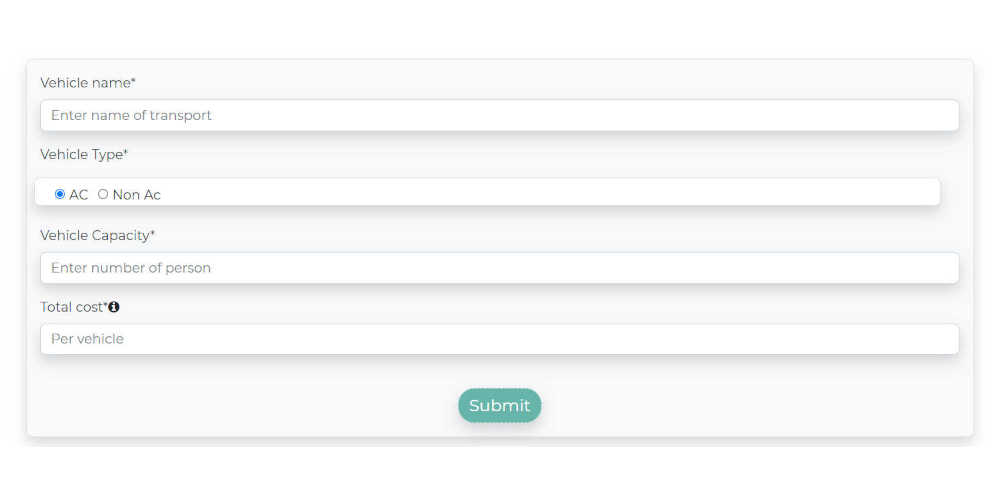
To Upload Details Click on “Upload Transport” present on the top of the screen.
Here, you need to enter the,
- Vehicle name – Name of your vehicle, such as an MV Boat, an AC Sedan, an AC Innova, and so on.
- Vehicle Type – Your Vehicle Type. Example Ac or Non Ac.
- Vehicle Capacity – Enter the number of people your vehicle can accommodate.
- Total cost – Charges for renting your vehicle per day.
After completing the above steps press, “Submit”.
Once you submit it, it will direct you to the Transport page. The Transport page will display an overview of the pieces of information you have just entered.
If you want to enter information about another vehicle, click on “Upload Transport” and apply the same steps to enter your information.
7.9) Trip
The trip section helps you combine all the information of your tour package into a single unit.
7.9.1) List New Trip
To Upload Details Click on “List New Trip” present on the top of the screen.
Here, you need to enter the,
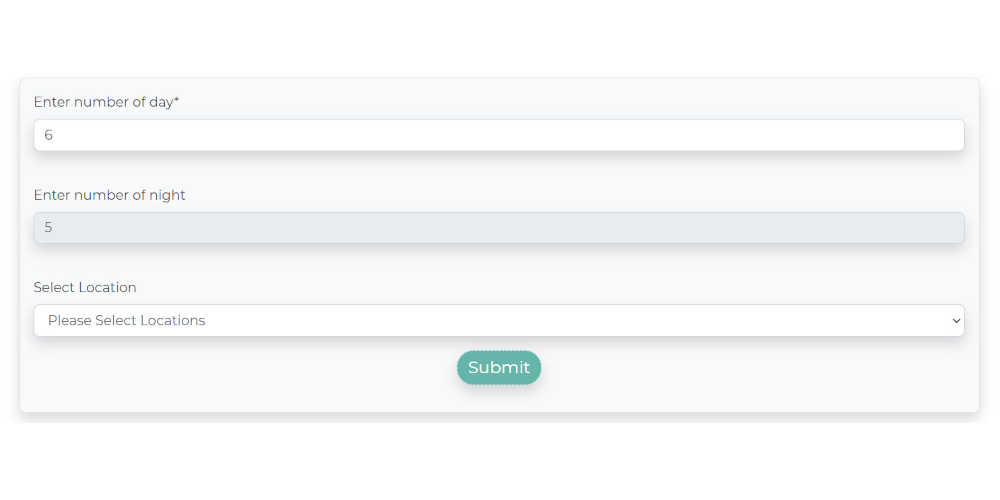
- Enter Number of days – Number of days the trip is going to last.
- Enter Number of nights – Number of nights the trip is going to last. This field is configured to auto-fill. As a result, if you select 5 for the number of days, the number of nights will be adjusted to 6.
- Select Location – The select location is a drop-down menu that contains all of the places you entered in the Location Section. Select a location to upload the Trip.
- Press “Submit” to redirect yourself to another tab, to fill out more details about your package.
Now you need to create your trip. To do so enter,

- Enter trip name – Enter the name of your tour package. For Example, Sunderban Tours, Gods Own Kerala Tour and so on.
- Select Hotel for Every day – Since you will be travelling from one destination to another, the hotels will keep changing as well. Therefore, select the hotel everyday basis.
For example, Day 1 -> Sardar Hotel, Day 2->Hotel INN etc.
Select hotel for day 1, Select hotel for day 2 and so on, is a drop-down menu that contains all of the hotels you entered in the Hotel Section.
- Select License Fee – The “select location” is a drop-down menu that contains all of the places you entered in the Location Section.
- Select Meal Plan – The “select meal plan” is a drop-down menu that contains all of the places you entered in the Meal Plan Section.
- Select Vehicle – The “select vehicle” is a drop-down menu that contains all of the places you entered in the Transport Section.
- Select MidTrip – Select MidTrip will contain all the trips which you have entered in the Miptrip section. Just Press and Hold Ctrl Key on your keyboard and click on the trips to include it on the list.
- Gender – Select the gender who can visit the places. If there is no such restriction, check the box next to “All”.
But since TouristTribe also provides group trips for “only men” and “only women”, you can check the boxes next to “Men” and “Women” as well.
What will it do?
It will show that the trip is available for everybody i.e. both family and an individual group can visit the place.
- Religions -Choose which religious groups are allowed to visit the site. Assume it is a spiritual location that only specific religious groups are permitted to attend. Therefore, disclose it to avoid any misinterpretation from your customers.
- Pick Up location – Mention the location from where you will receive them. For example, it can be an airport, railway station etc.
- Drop location – Mention where you plan to drop them off. It may be the same spot where you picked them up, or it could be somewhere else.
- Other Details -Other Details will include a variety of relevant information. For Example, Carrying Identity proofs, Sunderban is No Plastic Zone, Do Not Carry Plastic., We Keep the Boat Sanitized or any government guidelines the travellers must follow. Include promising details to attract more customers.
- After completing the steps press, “submit”.
7.10) Operator Holiday
Operator Holiday is where you will enter the number of days you will remail off duty.
7.10.1) Add


To Upload Details Click on the “Add” button present on the top right corner of the screen.
Here, you need to enter the,
- Reason – Provide a reason for your absence.
- From Date – Enter the first date of your leave.
- TO Date – Enter the last date of your leave.
After completing the above steps press “Submit”.
Once you submit it, it will direct you to the Operator Holiday page. The Operator Holiday page will display an overview of the pieces of information you have just entered.
7.11) Payment Info
Payment Info is the most vital part of the entire procedure. Remember, you can edit your payment info only once.
However, if you wish to modify it later, you must contact the TouristTribe Team. And provide them solid evidence to prove your identity.
7.11.1) Edit Symbol

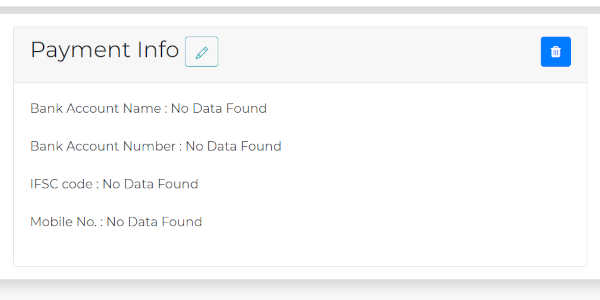
To Upload Details Click on the “edit symbol” present beside “Payment Info”.
Here, you need to enter your, Bank Account Name, Bank Account Number, IFSC code, Mobile No.
Conclusion : How to sell tour and travel packages online?
You can try this out if you want to increase your sales not only through Facebook pages, advertising using google or other platforms and your website where low page speed problem occurs in a regular basis.
The current days of our lives are all about adapting to the new technologies that are booming to a whole new level. Use them to your advantage to remain ahead in this race.
Hope this tutorial will help you to open an account in TouristTribe and will help you to gain more sales in the coming days.
Please share your thoughts in the comments section below. We would love to hear your feedback on it.
To learn more, subscribe to us now.